2 Ways on How to Insert PDF into Excel Easily
• Filed to: Convert PDF
Have you ever been in need of converting a file from one extension to another? This is a common issue people encounter and solving it should be rapid enough to save time. One of the most difficult conversions is the one from PDF to Excel Spreadsheets. Given the fact that converting documents can be done with the help of several platforms, both free and paid, you will need to know some basic info about how the process works and what it implies. This article is desired to explain these concepts as efficiently as possible and guide you through using a software - PDFelement Pro to insert PDF into Excel.
Part 1. Insert PDF into Excel with Data
When searching for software to deal with the documents you have to convert, you will see a lot of options to choose from. These options differ in terms of how many files you can upload at once, how well data is converted, how fast it is converted etc. One of the best products you can use for converting your documents is PDFelement Pro. With the help of this PDF tool, you can easily insert PDF into Excel.
How to Insert a PDF into Excel
Step 1. Launch the Program
Firstly, you will have to install the program following the instructions you are being given through the installer. After the installation is finished, you are ready to launch PDFelement. To do that, simply search for the icon or directly for the program and click it. The software should pop on your screen with the Homepage. From now on, you can start working with your files.

Step 2. Import the PDF
On the interface of PDFelement Pro, you will see a bunch of tiles, each with a different function. For instance, you can click Edit PDF, Create PDF, Combine PDF, Batch Process, PDF Template or Convert PDF. For this guide, you should click "Convert PDF" to convert PDF to Excel. In order to do that, after you've clicked the "Convert PDF" option, you need to upload your file to the platform. For this, you have several options: either simply click "Open File" in the left corner of the Homepage, either drag and drop the file or files that need to be converted.

Step 3. Convert PDF to Excel
After uploading the PDF file, you are ready to select the output options. Click on the "To Excel" button. You can use the toolbar in order to set the page range and extension. After each detail is checked twice, you can click "convert" and wait for the process to finish. In case you want to batch process multiple files, then you can click the "Batch Process" tile on the Homepage and follow the same steps.

Step 4. Directly Copy and Paste PDF Data to Excel
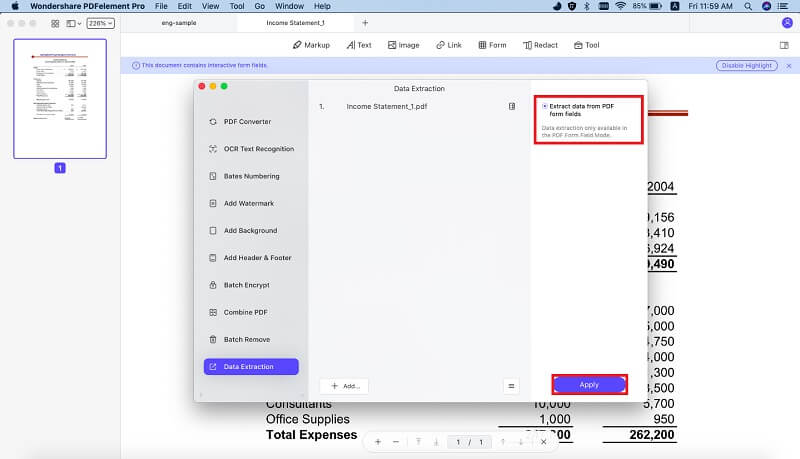
To copy and paste PDF Data to Excel directly, you can click on the "Select" button after you've imported a PDF file to the program. Then move the cursor to select the data you wanted, right-click on it and choose the "Copy" option. After this, you can paste selected data from PDF to the Excel file. In addition to this, you can also use this PDF editor to insert PDF in Excel by data extraction from PDF to Excel.
Why Choose PDFelement Pro to Insert PDF into Excel
PDFelement Pro is user-friendly and you can access all the necessary tools right from the Homepage. Except for converting PDF to Excel and other file formats, you can also use this tool to edit, protect and share your PDF documents easily. Here's what you can do with PDFelement:
PDFelement Pro for Mac can also perform the following functions:
- Organize PDFs: You can organize the PDF file considering your own preferences. You will have tools like bookmarking, bates numbering, customizing the header and footer, or changing the background at your own will. The user permission can be edited too in terms of controlling print or any other restrictions you may think of.
- Create and Fill PDF Form: You will have the opportunity to fill in PDF forms even though they are not initially interactive. You can transform its type using the tools you will find on the platform. Creating a PDF form is not complicated at all: you can simply choose the right option and customize it after your own requirement.
- Mark and Add Signatures to PDFs: You can add your own signature on batch files or even annotate documents you are uploading, meaning that you can add sticky notes, text boxes or even underline the text in the file. Freehand drawing can help you quickly mark things you don't want to forget while the PDF preview is in front of you.
- Convert and Create PDFs: No matter if you need the file in .doc, .ppt, .jpg or any other file format, the software is available for modifying it after your own will, without any data loss. In addition, you can combine multiple types of extensions into one single PDF file, making it much easier for you to find what you are looking for right in time.

Part 2. Insert PDF to Excel as an Object
This method gives users the possibility to insert PDF files as an object inside an Excel Spreadsheet, meaning that you won't be able to actually alter the PDF data, but it will allow you to view it in proper formatting no matter the computer used when opening it up.
Step 1. Launch Excel
In order to insert a PDF file directly into Excel using the Object function, you will need to launch Excel by double-clicking the icon. Once Excel is open, follow the next step.

Step 2. Click Insert in the Toolbar
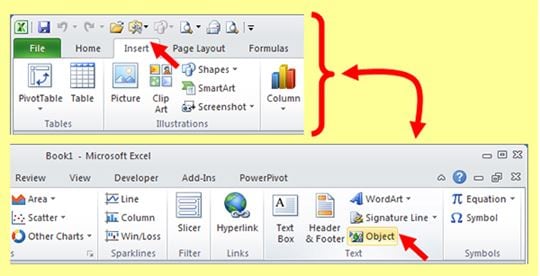
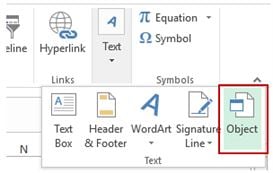
The next step would be to find the Insert tab positioned on the upper side of the Toolbar. After you found it, you will need to select "Object" found in the Text group.
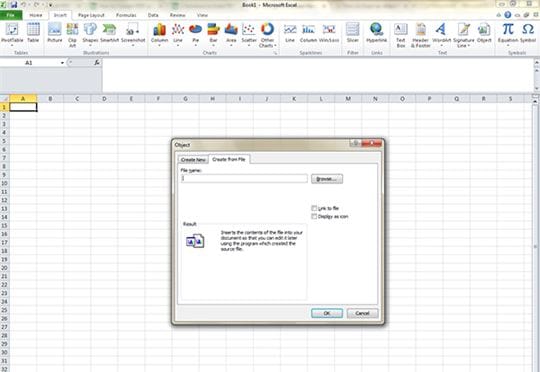
A dialog box will pop up and you will be able to see two options: Create New and Create from File. Click "Create from File" and select the "desired PDF" you want to insert as an Object and click "OK."
Part 3. Tips about Embed PDF in Excel
1. Fix the Embedded PDF File to a Cell
To insert an embedded PDF file, follow the aforementioned steps. Choose the cell you want to insert the file to, click the "Insert" tab and the "Object" tool. After the dialog box pops up, follow the same steps as above and create the embedded file.

2. Rename the Embedded PDF File
To rename the file you just created, pay attention to the options in the Object dialog box. You will see a Link to file option (which you should check), a Display as icon option, the Result preview and a Browse button. Next to the Browse button, there is a box to fill with your file name. After selecting the document and typing the desired name, click "OK."


Ivan Cook
chief Editor