PowerPoint Print to PDF with Errors? Solved!

• Filed to: Create PDF
Portable Document Format refers to a universally accepted file system that’s transferable with ease. It provides users with a means to distribute their documents, and access them anywhere, at any time through laptops, smartphones, tablets and other devices. When you print your PowerPoint files to PDF and then forward them to your friends or colleagues, they can view the contents with ease, and in original texts and colors. In this article, we outline how to fix the most common PowerPoint Print to PDF errors as well as everything you would like to know about the perfect software for printing PPT to PDF without problems.
PDFelement for Windows - The Best Tool to Print PowerPoint to PDF
PDFelement Pro is a multiple PDF tool. With the help of this smart PDF tool, you can easily convert PPT documents to PDF files and print the files easily. You can also edit the files with this tool with multiple editing tools. Apart from this, this tool enables you to convert PDF to Word, PPT, Excel, EPUB and other file formats in a high quality.


Key Features of This PDF Creator:
- It creates PDF documents that can work with all PDF editors, PDF converters, PDF readers and other third party applications.
- You can save your time by creating PDF files in batch at once.
- Due to the software’s super fast conversion speed, supported Microsoft files such as XLS, XLSX, DOC, DOCX, PPT and PPTX are printed to PDF in no time.
- It creates professional PDF files without Microsoft Office applications installed on Mac since it’s a stand-alone software.
- The program protects the Word, Excel, and PPT files saved to PDF and makes them look right and easily transferable.
Part 1: How to Print PowerPoint to PDF
To avoid any errors occur when you Print PowerPoint to PDF, you need a reliable PowerPoint to PDF printer. PDF Creator is the highly recommended printer and productively prints PowerPoint, Excel and Word files to PDF in an excellent way. The program is easy to use, and once you install it on your Mac, you simply need to drag and drop your PowerPoint files and then print them to PDF. There are no limitations on the file size/number to be printed to PDF, and you are free to effectively create PDF files even from large or multiple files in high quality.
All the output files come with high resolution that’s up to ISO PDF standards, and you can make them look more professional and shareable. They also keep and retain the original document’s layout and formatting. iSkysoft PDF Creator is a must have tool for individuals who own businesses or those who deal with hundreds of documents on a daily basis.
Steps to Print PowerPoint to PDF on Mac
Step 1. Download and launch the program
First download iSkysoft PDF Creator for Mac. And drag the “downloaded” program file to “Applications” to install it on your Mac. Installation takes a few seconds and then you can launch the software by double-clicking on its icon.
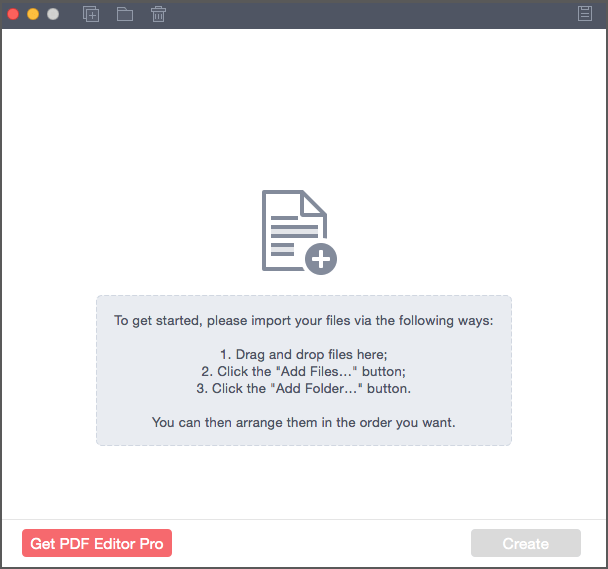
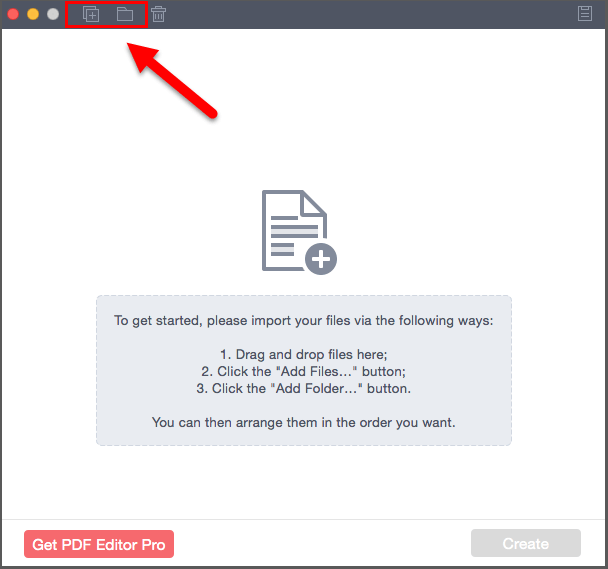
Step 2. Import PowerPoint to the program
Use any of the following 3 ways to import your PowerPoint Files to the program.
i. Directly drag then drop the PowerPoint files/folders to the program’s main interface and then they will be automatically uploaded.
ii. Hit the “Add Files” button and choose the PowerPoint files that you would like to print to PDF and then import them to the program.
iii. Click the “Add Folder” button and select the folders with the PowerPoint Files you want to print to PDF and then upload them to the software.
Step 3. Start to print PPT to PDF
At the bottom-right corner of iSkysoft PDF Creator’s interface, click on the “Create” button and then set the output PDF file's destination folder. Click “Save” to start printing PPT to PDF.
If you would like to view the output PDF files when the printing is finished, just click the “PDF” icon and select the “Show in Folder” option. You’ll then find the output PDF files which you can open to view and check by clicking the “Preview” option.

Part 2: Fix PowerPoint Print to PDF Errors
Below are the most common PowerPoint print to PDF errors with solutions to each problem.
1. Can't Print PPT to PDF Without Date
Solution:
i. Go to “File” and then select “Print.”
ii. At the bottom part, click on “Edit Header and Footer.”
iii. Even though you haven’t selected the “Date and Time, it will still be printed out, so just select “Date and Time.”
iv. Choose the “Fixed” option and then the “delete all the text from the box” option.
v. Click on “Apply to All.”
vi. You can then print your PPT to PDF without the date.
2. PowerPoint Prints to PDF With White Page Margin
Solution:
To print PPT to PDF without white page margins you can use Internet Explorer to change the print settings such that the printer will print less of the margins.
i. On the File tab select, Print> Print to PDF.
ii. Select “Click here to view the PDF of your document” to begin converting your PowerPoint file to PDF.
iii. Go to the Print box, just under the “Page Sizing & Handling” and click the “Custom Scale” option. You can then set a percentage that’s higher than 100% which will bring the background closer to the edges.
iv. Click “Print.”
3. Can't Get Rid of the Page Number
Solution:
i. Go to “View.”
ii. Click the “Handout Master” option.
iii. Uncheck the “Page Number” box.
iv. You can then print your PPT to PDF without page number.


Ivan Cook
chief Editor