How to Remove Watermark in Word
With the help of watermarks, people can generally add some attributes to their document created by Microsoft Word. However, sooner or later, you will feel that the watermark is no longer required and that’s when you will search for the best remove watermark Word so that you will know how to remove the watermark. If you are searching on the internet regarding how to remove watermark in Word, then here in this article we will talk about it in details. We also tell you about the detail steps how you can remove the watermark. Keep reading.
- Part 1. How to Remove Watermark in Word on Windows
- Part 2. How to Remove Watermark in Word on Mac
- Part 3. How to Remove Watermark with PDFelement Pro
Part 1. How to Remove Watermark in Word on Windows
If you are windows user and you would like to know about how to remove watermark from Word document, then follow this simple to understand guide:
Step 1. Click on 'Design' and then click on the watermark. If you are using Word 2010 or 2007, it will be under Page Layout tab and from there you can click on Watermark.
Step 2. Double click on the header are to open the header area. Now, put down the cursor on the watermark. You will see a four-way arrow and now you need to select the watermark. Click on delete, it is there on the keyboard, top right-hand side, press that and repeat the same process to remove all the watermarks.

Part 2. How to Remove Watermark in Word on Mac
For macOS users, here’s how to remove draft watermark from Word:
Step 1. Click on Design and then click on watermark, in case you are a Word 2011 mac user, go to page layout and click on watermark to get started.
Step 2. go to insert watermark box, you will three options there, no watermark, picture, and text, from these three you need to choose No watermark option.
Step 3. If this doesn’t work, click on the header section by double clicking on it. Now, select the watermark and you will see a few dots around it, hit the delete option on your computer and it should be deleted.

Part 3. How to Remove Watermark with PDFelement Pro
PDFelement Pro is you one-stop destination for all your answers that you have regarding how to delete watermark in Word. With this one tool, you can edit, convert, share, sign, create, as well as share your PDFs. You can either try their free trail or buy it to start using it forever. It is available for both Windows and Mac.
Step 1: Choose the file, import it to the watermark remover
First, launch the tool on your computer, import the file that you would like to work on, om the watermark in PDF tool. In order to get started, you have to click on 'Open File', which will be on the main interface.

Step 2: Removing ODF watermark
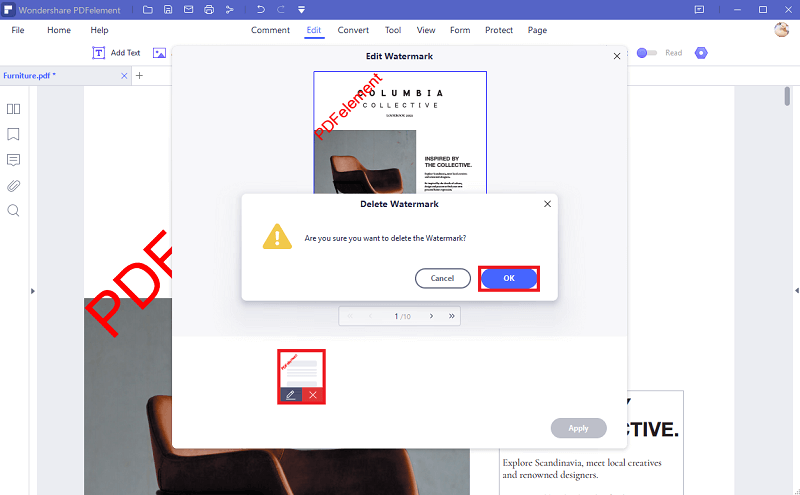
Now, click on the 'Edit' tab and from here, you will have to select 'Remove Watermark', it will be on the 'Watermark' drop down list. You will see three options there, new watermark, update watermark, and there will be remove watermark, click on remove watermark. Now, select the watermark that you would like to remove and finally click on 'OK' to get rid of it.

Step 3: Editing
Once you are done with removing the watermark, you can go ahead and edit the file if you would like to. Under the editing section, you can insert, modify, or delete images or contents. Go to the 'Page' tab, if you would like to edit the PDF pages. This section will also allow you to crop, delete, as well as, rotate the pages.

If you are looking for the best remove watermark from word document tool, then we will recommend you to try PDFelement Pro, because it is one of the best in the market. You can not just delete the watermarks, but also add watermarks as well. You can insert different background images, headers, and then links, of you would like to. PDFelement Pro is a powerful PDF and word editing tool that lets you edit, create, and convert files.
Here are some features that are worth taking note of:
- Use PDFelement to edit any of your word document that you would like.
- You can add annotations, as well as notes to all your documents without any issue.
- It comes with advanced OCR feature as well, which will allow you to edit all your scanned documents.


Ivan Cook
chief Editor