Cutepdf Printer: Print to PDF for Free
CutePDF Printer is one of the most recommended free print to PDF solution. Despite its cutesy name, the program is definitely not in its infantile stage and have evolved well over the past few years. Unlike its peers, CutePDF Printer does not have a standalone interface where it will work with any postscript-to-PDF driver (PS2PDF), such as Ghostscript, so that you will be able to create your own PDF files without buying any PDF writer softwares. Once installed, it will act as a virtual printer for all print-supported applications on your computer.
This free PDF printer has performed beautifully, creating PDF files within a short period of time that are small enough so that it can be easily attached to email correspondents. It also has an API feature so you will be able to build applications with PDF creation ability. Just make sure that before you print the original source file, no further alteration is needed. We think that the CutePDF Printer would have been perfect if it has text editing tools like many other PDF writers. PDFelement Pro is solution that can not only print but also edit PDFs.
Part 1: The Best CutePDF Printer Alternative
#1: PDFelement Pro
PDFelement Pro is a great PDF solution and comes with the ability to help you to print any files to PDF with a few clicks. It provides you with a quick way to upload your existing PDF, Webpages, images, or text files, and then directly Save the file as PDF format. Besides, you are able to edit the PDF file with various useful PDF editing tools. Even you can mark up or annotate the PDF file with the built-in annotation tools.
- Print the PDF files with ease.
- Easily edit PDF texts, graphics, images, links, watermarks, etc.
- Convert PDF to images, Word, Excel, PPT, EPUB and more formats.
- Create PDF from other formats and create PDF forms easily.
- Easily mark up and annotate PDF files with multiple markup tools.
- Combine multiple files into PDF and split PDF into several files.
- Add watermark, signature and password to PDF.
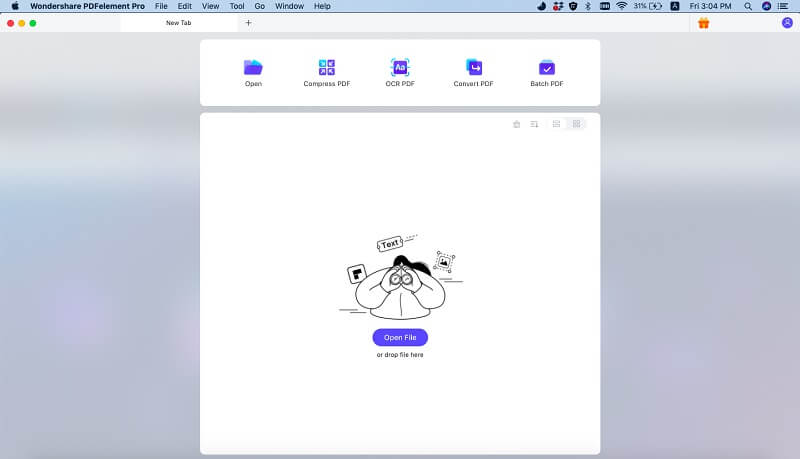
How to Print to PDF: In the main interface, click the From file button and select the file you want to print. Then go to the File menu and click Save as. Specifiy a destination and a new file name. Lastly, click Save to start the PDF printing. Just take a trial.
#2: PrimoPDF
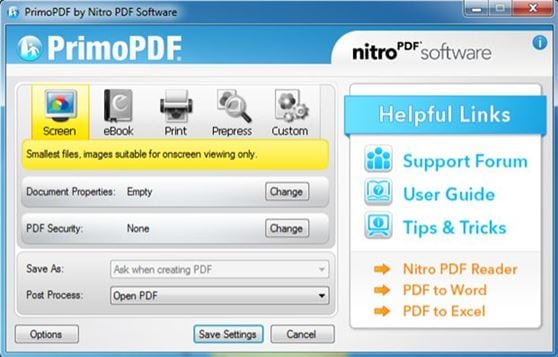
PrimoPDF is a free, straight forward PDF creator thatdoes not haveeanyy annoying popup ads to slow down your print to PDF process. Just like CutePDF Printer, you can turn anything into a PDF file so long that the source application supports printing. Its greatest advantage is that you can choose the properties of the output file (online viewing, eBook, office printing and prepress) before the program converts the source file into a PDF file. You can also merge multiple PDF files and secure any PDF files with passwords. Additionally, you will be able to add or change information such as the Title and Author in the Document Properties section.
How to Print to PDF: Open the source file. On the ‘File’ menu, choose ‘Print’. Select ‘PrimoPDF’ as the printer and click on the ‘Print’ button. The PrimoPDF interface will pop up. Choose the type of output file. Click on ‘Change’ if you want to alter the document properties or add a password to the PDF file. Choose the ‘Post Process’ and click on ‘Save Settings’.
Pros: Super easy to use; Fast; PDF files can be secured with passwords.
Cons: May install unwanted softwares during the installation process – be vigilant as they will usually run in the background and occupy your CPU’s performance.
#3: Bullzip
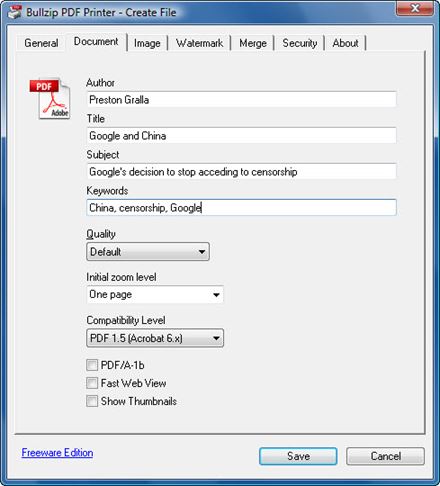
For a freeware, Bullzip packaged the most features among its peers that will give you high-quality PDF output every time. With it, you can opt to protect your PDF files with a password, encrypt your PDF file, add any watermarks, merge multiple documents, control over the output file quality and change/add the PDF file’s metadata. The program also has translation capabilities in a variety of languages! How amazing is that? Despite this plethora of great features, it is simple enough for a casual user to operate and is a great tool to have in corporate settings. We also like the fact that the program’s engineers are constantly updating the program based on feedbacks and requests received from Bullzip’s online support forum.
How to Print to PDF: From any print-supported application, print the document to PDF by choosing the Bullzip printer driver. A tabbed dialog box will appear. Via the tabs, you can customise the output PDF file. Once you are happy, click on the ‘Save’ button.
Pros: Interface is easy to navigate; Have capabilities to add security and display settings via dialog box.
Cons: Cannot deploy search function in the output file; Does not allow users to control the output file’s default zoom level when opened with Adobe Reader.
#4: doPDF
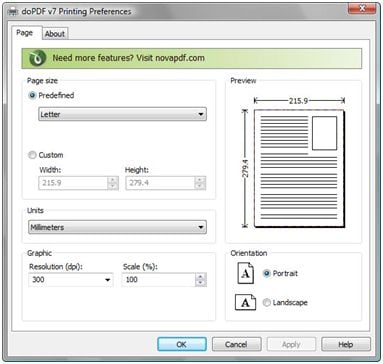
doPDF is probably the most similar program to CutePDF Printer in terms of its functionality. Like CutePDF Printer, doPDF is very basic. You will only be able to print to PDF and let control the quality of your output file. However, unlike CutePDF Printer, it does not need a PS2PDF to work. The good news is that doPDF creates PDF files that are searchable. Like CutePDF Printer, it is a great tool for home use and small businesses. We also like that it is easy and fast to set up without much problems, e.g. asks you to install additional software or toolbars.
How to Print to PDF: Open the document you want to print to PDF. Go to the ‘Print’ option and select ‘doPDF’ from the list of installed printers. A dialog box will appear where you will be able to determine basic settings like the page size and resolution. Click ‘OK’ to generate the output file.
Pros: Installation completes breezily; Able to toggle between different languages (just make sure you select the desired languages during the installation process); Good output quality.
Cons: The output file that was converted from an image file will not bear the original name, so you will need to rename it post-print.
Part 2: How to Download and Install CutePDF Printer
CutePDF Printer download and installation can be as easy as a breeze. You can download CutePDF Printer from CutePDF Printer official site, also you can get the free download from other sources. Just see the below simple tutorial.
Step 1. Download the CutePDF Printer from CutePDF, Softpedia or Filehippo
Simply click the download link and it will start the downloading process.
Step 2. Locate the installer and click on it twice
A dialogue box will pop up. Click ‘Yes’. When the setup wizard pops up, click ‘Next’. And read the license agreement and click on ‘I accept the agreement’. Click ‘Yes’. Then click ‘Install’ to complete the installation process.
Note: At this point, the installer will try to prompt you to install a toolbar and another program. Make sure you UNTICK and DECLINE them (unless you want them, that is).
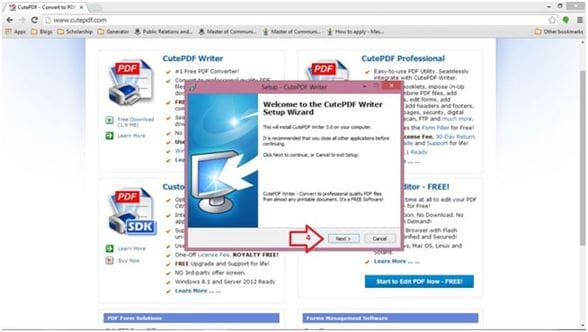
Step 3. Download the recommended PS2PDF program
If you don’t have a PS2PDF, CutePDF will prompt you to download the recommended PS2PDF program from their website. Click ‘Yes’. You will be directed to CutePDF’s support page. Click on the highlighted link. This will redirect you to another page. Click on the ‘Free Converter’ link to download the recommended PS2PDF.
The installer will download automatically. Double-click on the installer icon. Once it pops up, click ‘Setup’ and you are done!
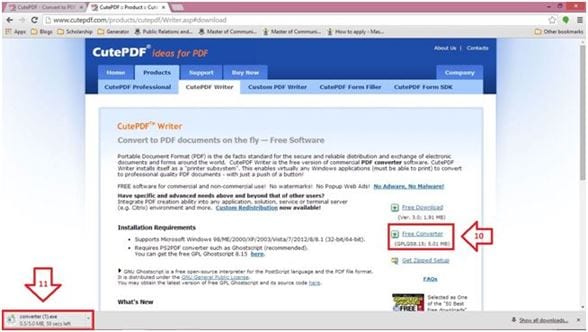
Part 3: How to Print to PDF with Cutepdf Printer
To use Cutepdf Printer to print to PDF, you need to first install a PS2PDF converter, which is a free postscript printer driver that support you to process the PDF printing. You just can follow up the steps in Part 1 to process the installation.
- Step 1: In the application, click on the ‘File’ menu and select the ‘Print’ option.
- Step 2: Select ‘CutePDF Writer’ from the ‘Printer’ dropbox.
- Step 3: Click on the ‘Print’ button.
- Step 4: Then choose the destination folder to save the output file.
- Step 5: Choose a file name for the output PDF file.
- Step 6: Click ‘Save’.
- Step 7: You will be able to find your printed PDF file in the destination folder.
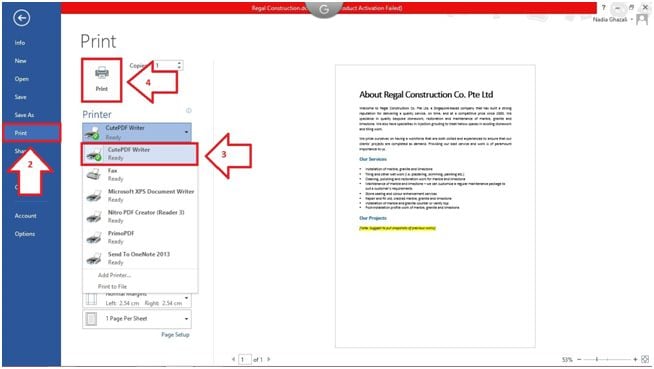
Part 4: Cutepdf Printer Review and Troubleshooting
Cutepdf Printer Pros:
- The free version has most of the features that the paid version has!
- Fast and resize printed PDF files to a more email-friendly size.
Cutepdf Printer Cons:
- Printed PDF files cannot be password-protected – you need to upgrade the program to the paid version.
- No text editing tool, so you will not be able to do any post-PDF alterations to your document.
Troubleshooting on Using Cutepdf Printer
1. Reducing the output PDF file size
Step 1: Go to %Program Files%\Acro Software\CutePDF Writer\PDFWrite.rsp
Step 2: In the RSSP file, search for the key parameter –dPDFSETTINGS=configuration
Step 3: The word configuration can be substituted with:
- /screen for low-resolution output that will give the smallest possible file for quick downloading;
- /printer for slightly larger file output that is ideal for office printers;
- /prepress for the largest file output that will be slower to download but great for high-resolution press printing (this is also the default configuration setting);
- /default for file output that will be good for any use (not recommended as it will probably give you a low-resolution file when you need something in high-resolution)
2. The generated PDF file has the wrong or missing text characters
For Win2000 onwards: click on ‘Properties’ after selecting CutePDF Writer from the list of printers. When the dialog box pops up, click on ‘Advance’. On the TrueType Fonts setting, choose ‘Download as Softfont’ for font embedding. By default, the program selects ‘Substitute with Device Fonts’.
For Win98/ME: Open CutePDF Writer property settings and select ‘Always use TrueType Fonts’ in the Font settings.


Ivan Cook
chief Editor