Useful Tips on How to Create Email Signature
Look at the bottom of the last email that you sent out from your business account. Do you have a signature? Does the signature of your email pop in automatically with your name, your phone number, your email address, your logo, and certainly your web address? Maybe even a quick listing of your products and services. It's a simple way to make sure you constantly keep your contact information in front of as many people as possible. In this way, anyone who gets an email from you can get information from and keep in touch with you. They can learn more about your company, products, and services. Have a beautifully designed email signature will portray your branding and perhaps your message.
After the accomplishment of the email signature, another point is the internal signature of your file. About this issue, PDFelement (or PDFelement for Mac) is the best solution.
- Part 1. Creating Your Outlook Email Signature
- Part 2. How to Create Your Gmail Email Signature
- Part 3. Tips to Create Professional Email Signature
- Part 4. PDFelement: The Best Tool to Make Great Signature Inside File (Editor Pick)
Part 1. Creating Your Outlook Email Signature
In this part, you will know how to create and change email signature in Outlook. Some detailed steps will be provided.
Method 1. How to Add an Email Signature in Outlook
You can easily create email signature in Outlook to help recipients know more about your professional details. The email signature is at the bottom of your email. Usually include your name, title, contact information, and so on.
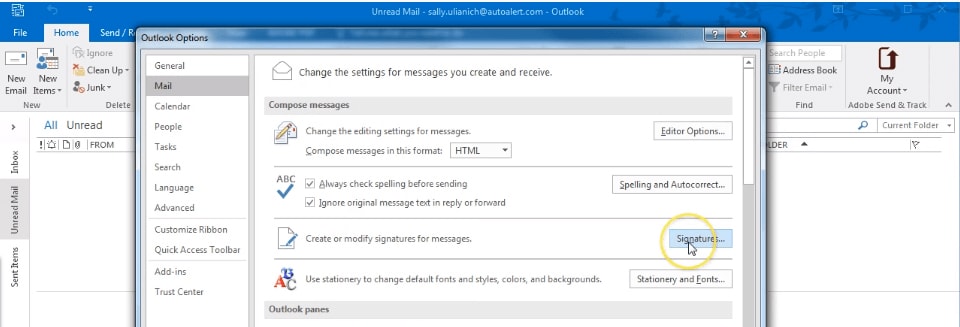
Step 1: Open Microsoft Outlook from the start menu, and click on “File”. Then go down to “Options” and click on “Mail” tab.
Step 2: Click on "Signature" botton of “Compose messages” section.
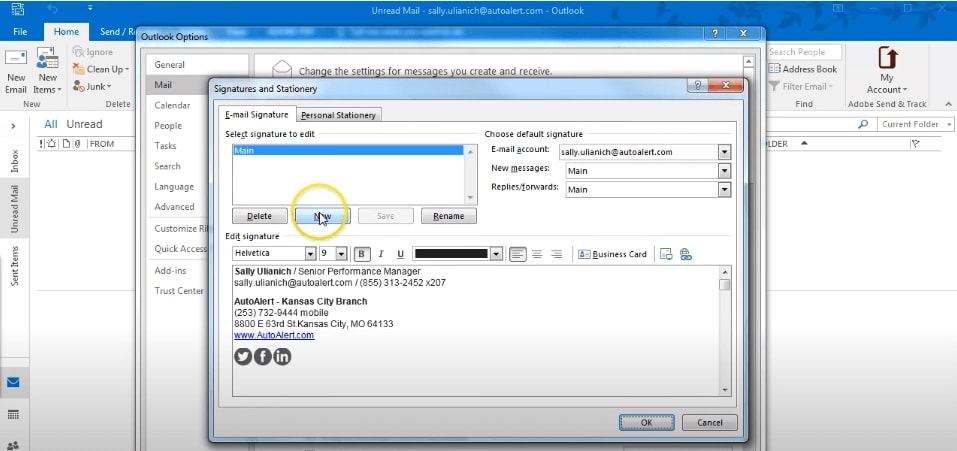
Step 3: Then, click on “Create a new signature” botton.
Step 4: Here you can create your signature. You can also automatically create a link or hyperlink.
Step 5: Setting the signature as your default will be a great option when you reply to messages. Once you're done, just click on “OK” button.
Method 2. How to Change an Email Signature in Outlook?
After creating a signature, or there is an existing signature in Outlook. If you want to change it to another one, you can follow those steps. This method will show you a convenient way to change email signature in Outlook.
Step 1: You can easily edit or modify your email signature in Outlook. Just applying the procedure as the procedure mentioned above. Then, choose the signature you want to edit or modify from the select signature to edit pane.
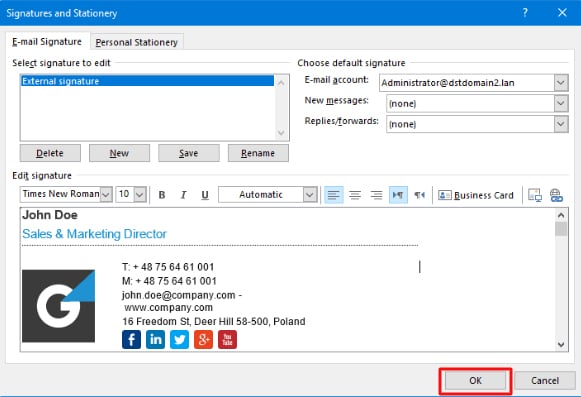
Step 2: When you hit a new email message, you can pick the signature you want to apply in the signature section.

Part 2. How to Create Your Gmail Email Signature
Do you want to create Gmail email signature? Follow the steps, you can create your personalized and professional Gmail email signature easily.
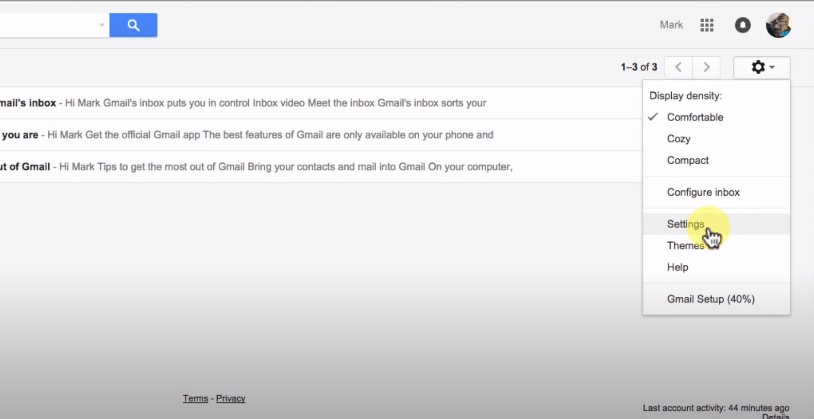
Step 1: Log in to your Gmail account. Then click on a gear icon at the right top corner, and go down to the "Settings".
Step 2: Scroll down, and you can type what you want in the "Signature" section.
Step 3: Now you can use the other options built-in here, like bold, italics, and underline. You can also change the font color, even add a link or an image.
Step 4: You could write what you want here, such as your name and website address. If you want to make a clickable link, just highlight it and click link option.
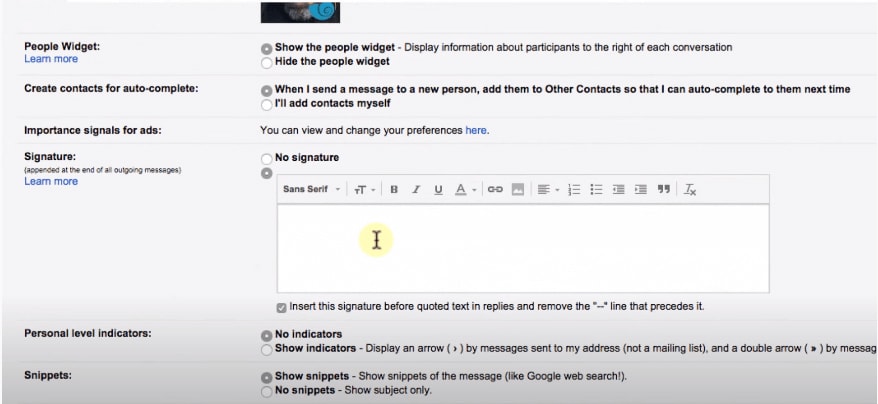
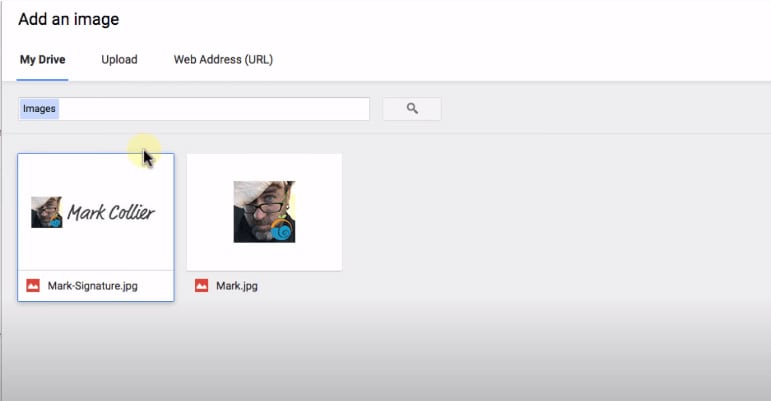
Step 5: If you would like to add a picture, you can click “Insert Image” option. Here you could either choose something from Google Drive that you have already uploaded or upload something from your hard drive.
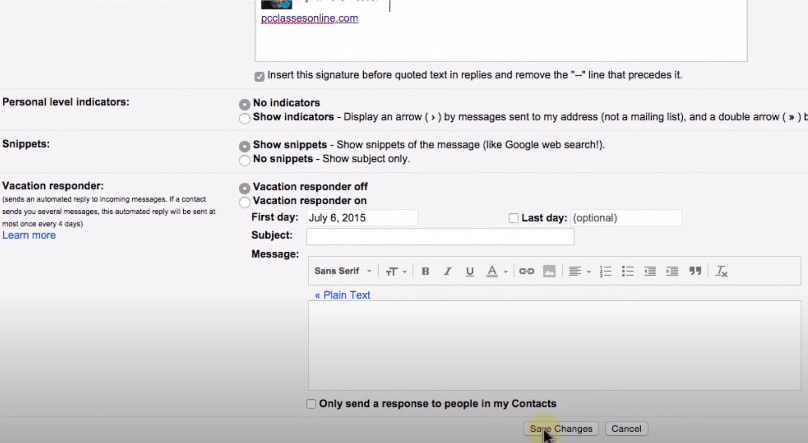
Step 6: After that, click on “Save Changes” button.
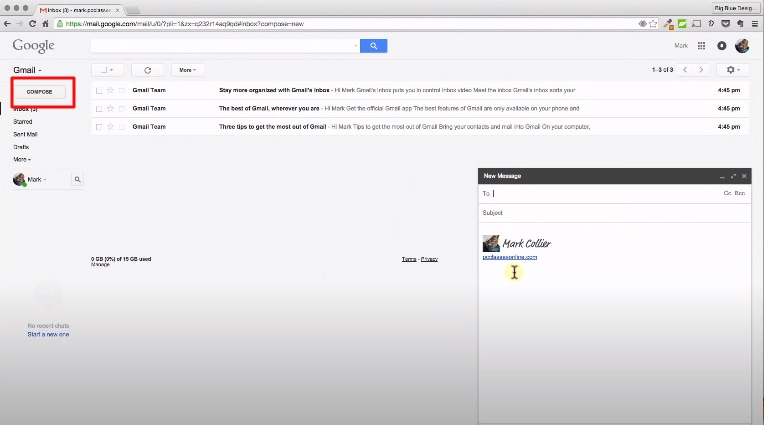
Step 7: If you want to see what it looks like, just click on “Compose" button.
Part 3. Tips to Create Professional Email Signature
This part is about some useful tips which are beneficial to the quality of your email signature. Those tips can make your email signature more professional, impressive, and so on.
1. Simplified Information
To create a professional email signature, you should keep your email signature format very simple. Having too much information in your email signature could become your recipient frustrated or distracted.
2. Right Colors
Your email signature should stick with one or two branding colors. It will make your email signature more visually attractive to recipients. You should use 1 or 2 branding colors, logo, and graphical elements. More than 2 colors can unpleasant for the recipient. So, you should have a good sense of design.
3. Typesetting
Using multiple fonts and sizes in your email signature will make a bad impact on recipients. Limit yourself to only a couple of different sizes and one font family. A single and simple font makes an email signature more professional and modern. The font size of an email signature also matters. Too small will be unreadable, and too large will be unpleasant.
4. Title
The title of your email signature should be short and to the point. As we mentioned that having too much information in your email signature could make your recipient frustrated or distracted.
5. Contacting Ways
You should always include essential or useful contact details in your email signature. You can include your personal information(your name, your position), company information (company name, office address), contact information (phone number, social media account), and points of professional interest. You are not suggested to contain too much information in your email signature. Having too much contact information can make an impression that you are slightly desperate.
After the accomplishment of the email signature, another point is the internal signature of your file. If you want to add a signature to your PDF documents digitally, PDFelement is the best choice for you.
Part 4. PDFelement: The Best Tool to Make Great Signature Inside File (Editor Pick)
PDFelement has become one of the most widely used document management software solutions preferred by companies.
1. Why Choose PDFelement to Create Signature
PDFelement (or PDFelement for Mac) authenticates files in the form of a signature application. You can create signature in this software. PDFelement is your secret to working smarter with office documents when you work with PDF contracts, invoices, forms, data, and reports. You can easily edit your PDF just like in Word, and send them to others. You can compress your PDF using different ways. By using PDFelement, you can export data from the 100s of PDF forms into a single Excel sheet. And this process takes only seconds. PDFelement can manage their workload with its robust features. So, PDFelement will be the best and suitable choice for them.
Highlight Features of PDFelement:
- Add signature to PDF and customize it.
- Edit PDF text, images, links, and annotations with built-in editing tools.
- Create or convert PDF to or from other formats like Word, Excel, Webpages, etc.
- Secure PDF documents with a password and decrypt protected PDFs easily.
2. Steps to Create Signature Inside File
Follow the steps, you can easily create signature inside file.
Step 1: Launch PDFelement.
Step 2: Open a PDF file to import it with PDFelement.
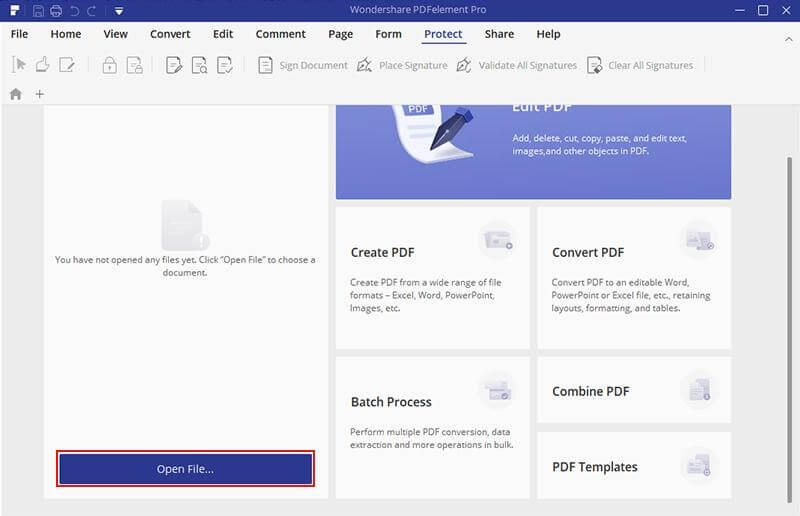
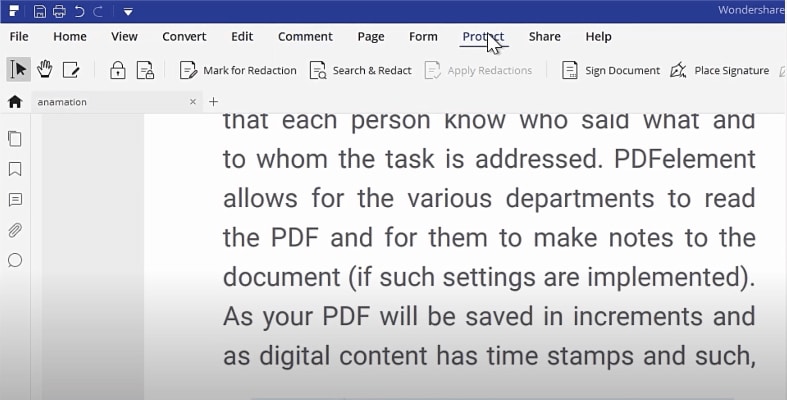
Step 3: Click on “Protect” at the top of the menu, then click on “Sign Documents”. You can easily add a signature to your PDF now.
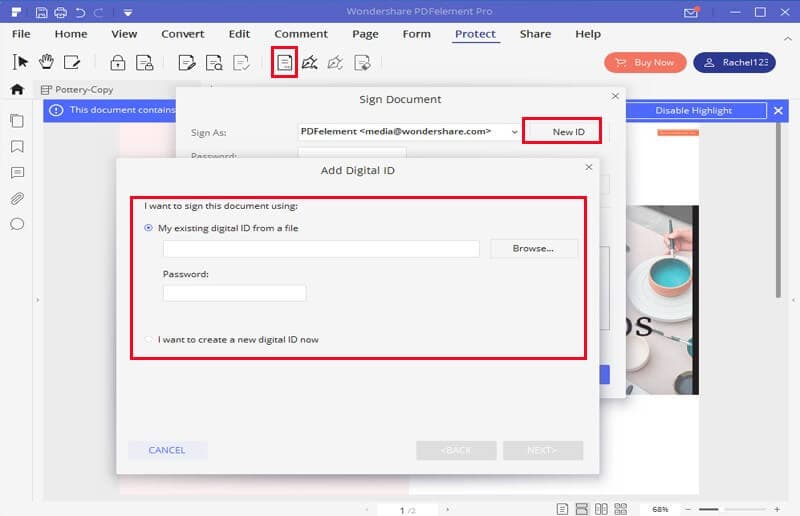
Step 4: You can also sign document by creating your new ID. After clicking on “New ID” button, you can draw an area where you want to place the digital signature. In this pop-up window, you can create your own digital ID type in the necessary information, and set a password for the digital ID. Then choose an area to add your digital signature after setting the password and saving it.
Conclusion
Signature in email and document should be seen as the same important. Adding a professional and personalized email signature in email can help people or companies achieve their goals more efficiently. No matter in social needs or advertisement needs. As for create signature in file, PDFelement (or PDFelement for Mac) as a great tool. It can makes your file more professional and personalized.


Ivan Cook
chief Editor