This article guides you on the best way to resize PDF on Mac with PDFelement.
Working with cumbersome PDF files is not easy, especially if you want to share, process, or spare some memory space in your Mac device. If you are a Mac user and want to get out of this mayhem, the best resort is to resize your PDF file on Mac. While this is true, scores struggle to resize PDF on Mac and end up messing up with their PDF files because they didn't use the right tool. Luckily, this article gives you a step-by-step guide on how to resize PDF on Mac using the best tool.
How to Resize PDF on Mac
PDFelement is arguably the best all-in-one PDF software. This wonderful program is packed with an assortment of excellent features that makes it a complete PDF package. Furthermore, PDFelement is fast, easy to use, compatible with a variety of devices and file formats, and supports batch processing. This program allows its users to create, convert, edit, annotate, protect, share, compress, merge, print, and perform PDF OCR.
Resize PDF on Mac with PDFelement
PDFelement offers one of the easiest ways to resize PDF files, as shown below.
Step 1 Open PDF File
To begin with, launch PDFelement on your Mac computer, then click the "Open File" button on the main interface. You should now access the file directory window. Here, select the PDF file you want to resize on Mac.
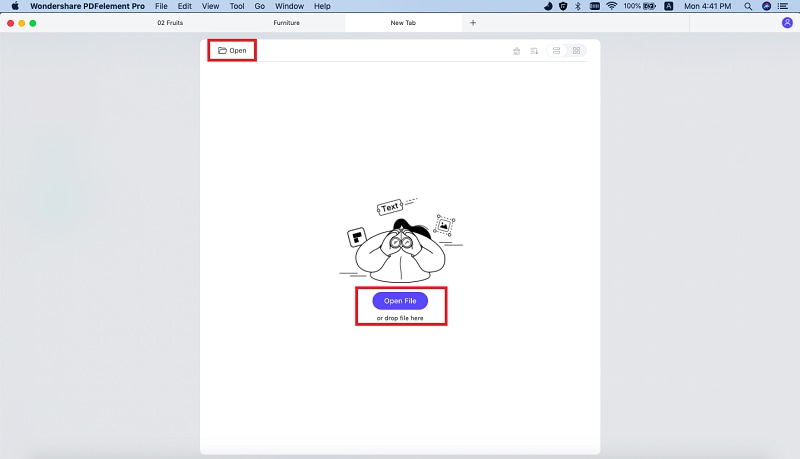
Step 2 Resize PDF on Mac
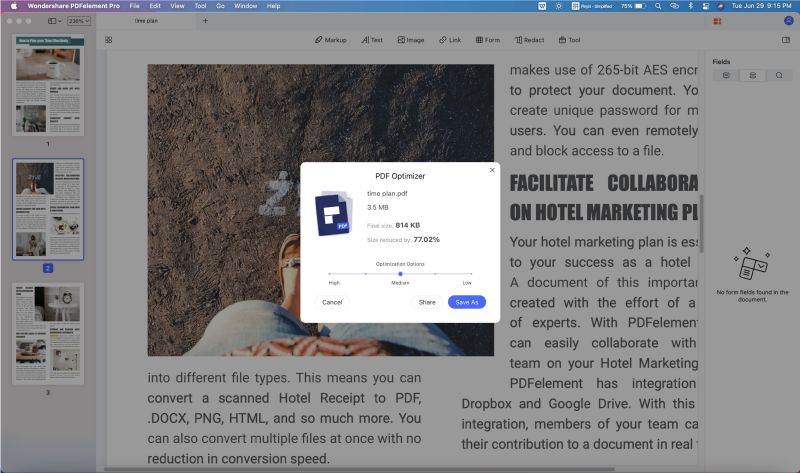
When PDFelement loads the uploaded PDF file, proceed to the "File" tab and select "Save as Other," followed by "Optimized PDF."

Step 3 Change Compression Option
Now, the "PDF Optimizer" pop should appear on the screen. Drag the slider to choose the desired optimization degree. When you are satisfied, click the "Save As" button.
How to Resize PDF with Preview on Mac
Preview is an inbuilt Mac application that allows users to view images and PDF files. Although the functionality is not much stretched, it is still a good option to resize PDF on Mac. The good thing is that it is free and comes installed on Mac computers. However, PDF features are slim, and users can struggle to navigate through the processes. Nevertheless, it is worth trying. The steps to resize PDF on Mac using Preview are explained below.
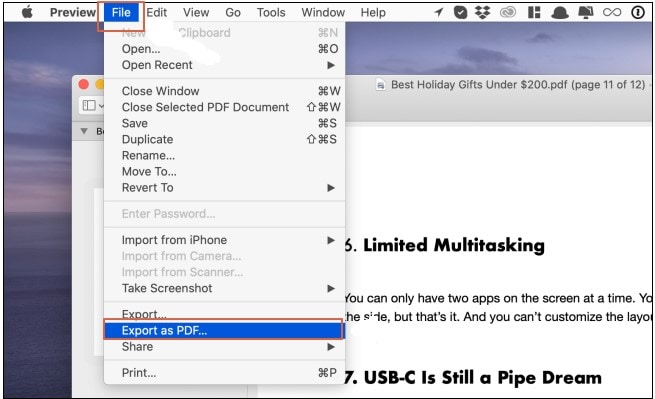
Step 1. First, right-click the target PDF file on Mac and choose the "Open With" option. From the options displayed, choose "Preview."
Step 2. When the PDF is displayed on Preview, head to the "File" tab and select the "Export as PDF" option.
Step 3. In the subsequent pop-up window, choose "Quartz Filter" followed by the "Reduce File Size."
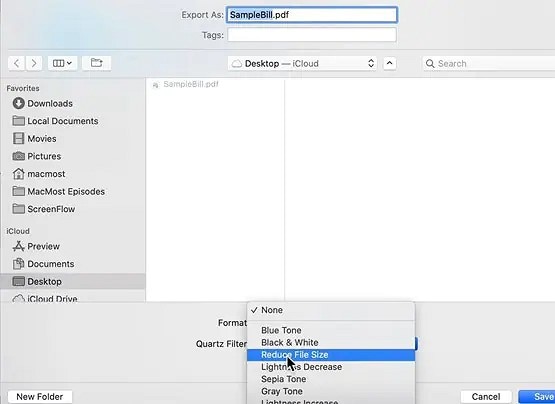
Step 4. Finally, click the "Save" button to reduce the size of your PDF file.
How to Reduce PDF Size with Adobe Acrobat on Mac
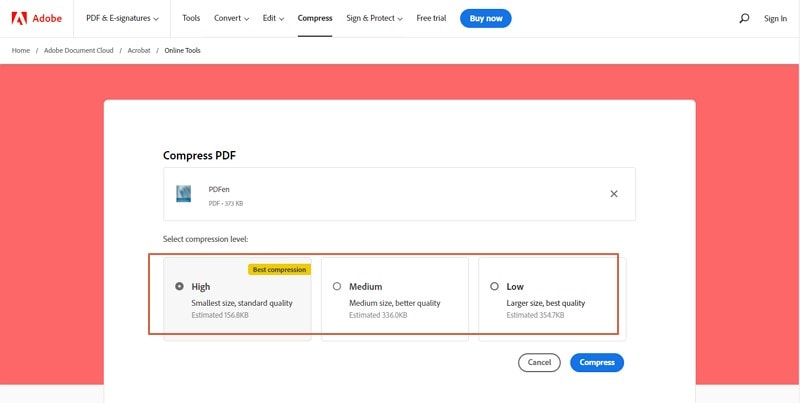
Adobe Acrobat has been around and is an excellent PDF tool. This program has plenty of features and is a good option to reduce PDF size on Mac. Adobe Acrobat online works on several browsers, including the popular Google Chrome. Users can select up to three different compression quality/sizes. While Adobe Acrobat is viewed by many as a good PDF solution, the expensive subscriptions and lengthy processes are major drawbacks and cannot be ignored. The following steps illustrate how to reduce PDF size on Mac using Adobe Acrobat.
Step 1. Open a suitable browser on your Mac, say Safari, and visit the Adobe Acrobat resize PDF page.
Step 2. Hit the "Select a File" button and follow the screen instructions to select and attach the PDF file that you want to resize on Mac.

Step 3. Once uploaded, choose the compression level quality (High, Medium, or Low) and click the "Compress" button to initiate the process of resizing your PDF file.
Step 4. When the compression process is completed, click the "Download" button to fetch your resized PDF file.


