How to Protect PDF from Editing
• Filed to: PDF Security
There are plenty of reasons to protect your document from editing. If you are handling sensitive PDFs containing private information, you would not want unauthorized users to add or remove anything from the document. The editing may not be much, but it can have far-reaching consequences. Therefore, it is important to protect PDF from editing if you don’t want to immerse yourself in trouble or unpleasant situation. Fortunately, this article takes you through a comprehensive guide on how to protect PDF from editing.
- Method 1. Protect PDF from Editing with Easy
- Method 2. Protect PDF from Editing with Converter Tool
- Method 3. Sign Document to Protect PDF from Editing
Method 1. Protect PDF from Editing with Easy
PDFelement Pro is a powerful PDF solution tool used by different organizations across diverse fields. The good thing with PDFelement is its unmatchable success across different types of PDF tasks. The elegant interface, zero learning curve, plenty of useful industry-standard features, compatibility, incredible speed, and affordability makes it a must-have tool for PDF tasks. This tool allows users to protect, edit, annotate, print, convert, create, compress, organize, fill forms, perform OCR, and share PDFs with ease.
How to Protect PDF from Editing with PDFelement
Follow these steps on how to protect PDF from editing.
Step 1. Open a PDF File
The first step is to open PDFelement on your computer. Once the primary interface is displayed, proceed to click the “Open files” button on this same window. Upon clicking, you will be taken to the file explorer window. Here, navigate to the folder where the PDF file you want to protect from editing is saved. Select the file and click “Open” to upload it to PDFelement.

Step 2. Set Password on PDF
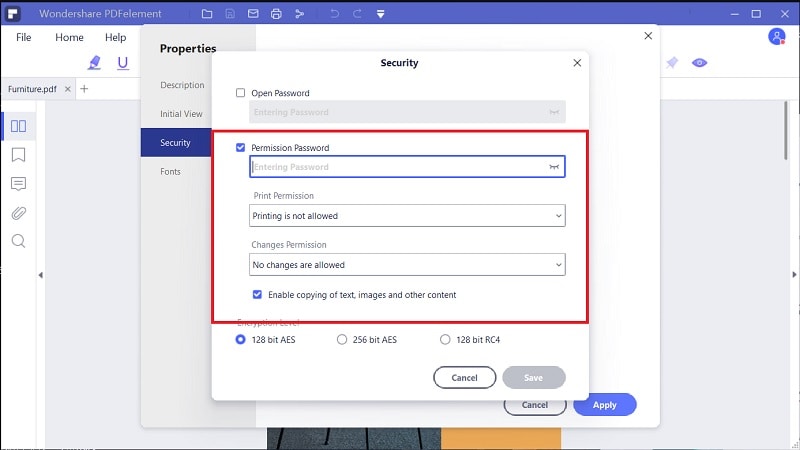
When the PDF file is uploaded, head to the “File” menu and choose the “Properties” option. From the subsequent “Properties” window, select the “Security” option followed by “Permission”. You should see the “Security” window. Check the “Permission Password” checkbox, then enter the desired permission password.
Now, click the “Changes Permissions” drop-down icon and select “No changes are allowed”. You can also choose to edit print permission by selecting the desired option under the “Print Permission” section. Now click “Save” then “Apply” to confirm the settings and close the “Security” window.

Step 3. Save PDF with Password
Finally, you need to save the changes you have made to avoid being discarded by the program when you exit. To do this, go to the top of the window and click the “Save” icon.
Method 2. Protect PDF from Editing with Converter Tool
Another plausible way to protect PDF from editing is to convert them to image. Once it is in image form, you cannot easily unlock texts unless you use a dedicated OCR tool.
Step 1. Open a PDF File
Begin by opening PDFelement on your device. With the PDFelement interface displayed, hit the “Open files” icon. The program immediately opens the file directory window. Go to the folder where you saved the PDF file that you want to protect from editing. Select the file and hit “Open” to upload it to the PDFelement window.

Step 2. Convert PDF to Image
Wait for the program to upload the PDF file successfully. Once it is successful, head to the toolbar and click the “Convert” tab. You should see several PDF convert options displayed. Ignore the other options and click the “To image” icon. The program will pop up in the “Save As” output window. Select the desired save location, then click the “Save As” drop-down icon to select the desired image format. Finally, click “Save” to trigger the conversion. Monitor and wait for the conversion process to complete to access your file.

Method 3. Sign Document to Protect PDF from Editing
Appending signatures on PDF documents is one of the common ways to protect PDF from editing. The following steps illustrate how you can use signatures to protect PDF from editing.
Step 1. Open a PDF File
Start by opening PDFelement on your computer. Once it is open, click the “Open files” icon and take you to the file explorer window. Browse the target PDF file and select it from the respective save folder. Next, hit “Open” to upload the PDF file into the PDFelement interface.

Step 2. Sign Document to Protect PDF from Editing
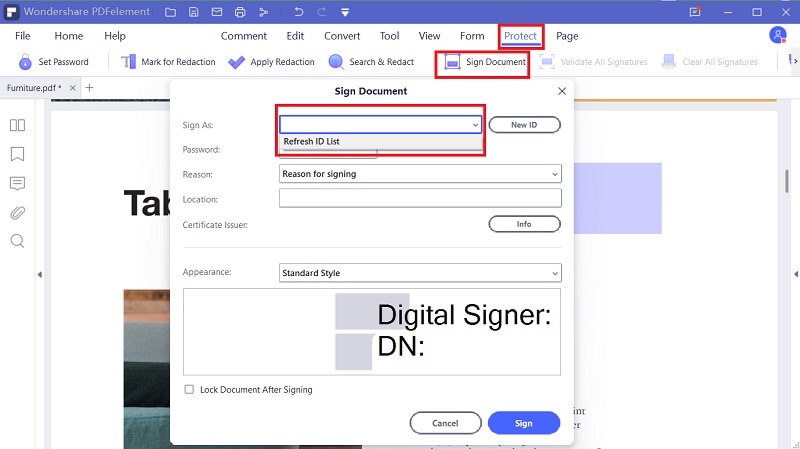
Now that the PDF file is uploaded, it is time to apply a signature on the document to protect it from editing. This is very simple. Go to the toolbar and click the “Protect” tab. Click the “Sign document” option and draw a rectangular region where you want to apply the signature from the options displayed below it. The “Sign Document” dialogue box will pop up.
Here, fill in the fields provided, including ID, password, the reason for applying the signature, and appearance. Once done, click “Sign” to apply the signature on your PDF.


Ivan Cook
chief Editor