Are you struggling to find the best way to esign PDF? Go through this article to get the best solution.
Signatures have been key in the authentication or ownership of documents. Traditionally, people have been manually appending signatures using a pen on a document. However, the landscape has changed, and esign PDF is the order of the day. Esign documents is easier and faster because it makes it is a digital form of appending signatures. While this is the case, myriads of people are still struggling to esign documents. This is why we have created a detailed guide on how to esign PDF free.
How to Esign PDF with PDFelement Pro
PDFelement Pro is the best all-in-one PDF software trusted by plenty of people, organizations, and institutions across the globe. This program is equipped with nearly every single feature you would demand from an up to scratch PDF tool. The amazing interface, ease of use, incredible speeds, and compatibility with several devices makes it a must-have PDF software. With PDFelement, you can convert, edit, annotate, create, organize, compress, print, read, sign, and protect your PDF like never before.
Step-by-step Guide on How To Esign PDF with PDFelement Pro
Here are steps on how to esign PDF using PDFelement Pro.
Step 1Open a PDF File
Launch PDFelement on your PC then click the “Open File” icon on the primary window. The file explorer window should open to allow you browse the PDF file that you want to esign. Select this file and click the “Open” button to upload it to PDFelement window.

Step 2Create Signature
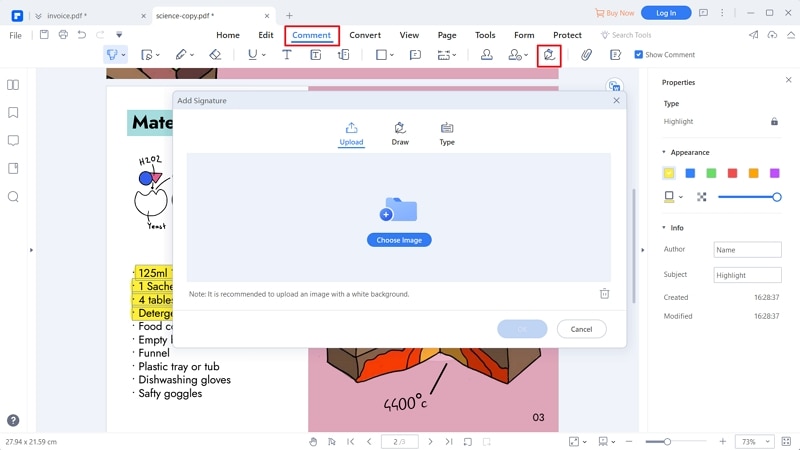
When the PDF file is loaded, navigate to the toolbar and hit the “Comment” tab. from the list of options displayed below it, click the “sign” icon on the far-right. Upon clicking, the “Add Signature” window shall be displayed. Here, you can choose to draw, type, or upload an e-signature to your PDF.

Step 3Esign PDF
After choosing the desired e-sign PDF option, follow the on-screen instructions to esign PDF. If you choose to type your esignature, you start by selecting the “Type” option. Next, type the desired esignature in the text box and click “OK” to confirm. You can choose the esign PDF color of your choice at the bottom of the “Add Signature” page. The signature will appear on your PDF. Drag it and release it on the desired location.

Step 4Save PDF File
Now that you have added an esign to your PDF, what remains is to save the e-sign PDF changes. Otherwise, the program will discard them. To save the changes you have made to your document, hit the “Save” icon at the top of the window. Your PDF file is now saved and you can safely exit the window if you want.
How to Esign PDF Online
Wondershare Document Cloud is a straightforward and powerful tool that allows users to sign PDF for free. It makes it seamless to send esign PDF requests to one or more recipients in real-time. It also provides several templates to choose from and makes your esigning great. Again, you can send bulk documents to different recipients at the same time.
Step 1. Visit the Wondershare Document Cloud homepage and sign it. Hit the “Upload Files” button and browse for the PDF file that you want to esign. Click “Upload” to upload it.
Step 2. On the Wondershare Cloud page, select “Sign” followed by either “Request Signatures” or “Bulk Send”.
Step 3. On the next page, hit “Drag files here” then drag the files you want to be signed. Click “Next” to proceed. Select “I need to sign the document first” and then hit “Next” on the next page.
Step 4. Drag the sign holders on the left pane onto your PDF. Again click “Next.”
Step 5. Now enter the subject and content in their respective fields, then click “Send” to send the file for esigning.

How to Esign PDF Free
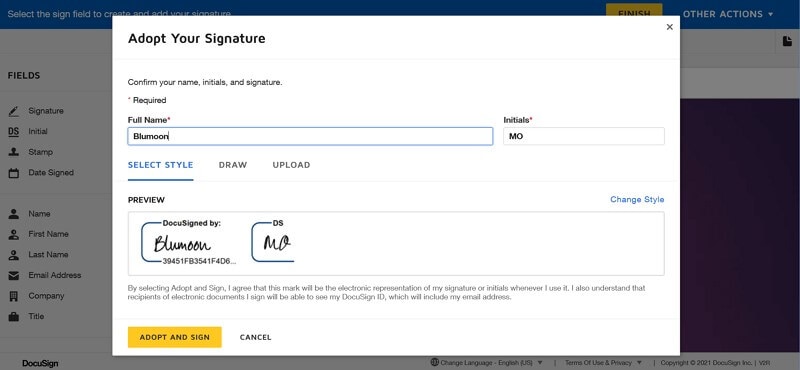
Adobe Document Cloud is one of the best online esign PDF tools. This program gives users a fast platform to easily sign their PDF files online. With Adobe Cloud Document, you can sign documents from any browser. Here, you create your signature, complete forms, add text boxes, and signature initials with ease.
Step 1. Visit Adobe Document Cloud page and click the “Select a file” button to upload the desired PDF file. Alternatively, you can drag and drop the file on the interface.
Step 2. When the PDF file is uploaded, click “sign yourself” and choose to type, upload, or draw a signature.
Step 3. Enter your signature and click “Apply.” Drag it to the desired position. You can also add initials.
Step 4. When you are done, click the “Close” drop-down icon and choose to send or “Download a copy.”


