If you want to convert and edit Google Slides into PDF easily and without any complications, then this guide is for you to use PDFelement, one of the best programs in the industry.
There are various tools available in the market to save Google Slides as PDF and to edit Google Slides into PDF, but what differentiates PDFelement from these are its various features to modify the document according to your specifications easily. So keep on reading this guide from start to finish if you want to effectively convert Google Slides to PDF, and edit your Google Slides into PDF using PDFelement.
Two Methods to Convert Google Slides to PDF
If you have a Google Slides presentation and want to save it as a PDF file, then this guide is definitely for you, as we are going to explain everything you have to know in order to convert your Google Slides into PDF. The actual slides presentation will be in Google Drive after you finish the conversion process. You will have a copy of the file that is in the PDF file type.
There are two ways you can convert your Google Slides presentation into a PDF file the one is downloading it as a PDF and the other is printing as a PDF.
Method 1 Download Google Slides as PDF
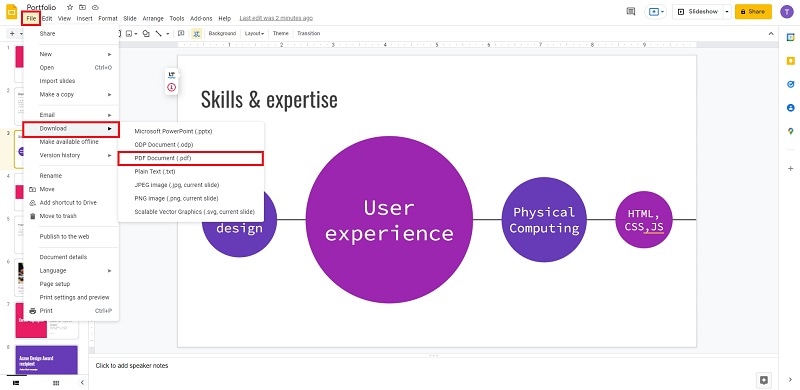
If you want to convert your Google Slides into PDF, then the first and easy method you can utilize is downloading it as a PDF. First, you need to open your representation and then go to the menu at the top of the screen under the title of your presentation. After this click on the File tab and then choose the PDF document.
In a matter of seconds, you would notice the PDF file would start to download. Your downloaded file will be saved in the download folder of your system by default.

Method 2 Print Google Slides as PDF
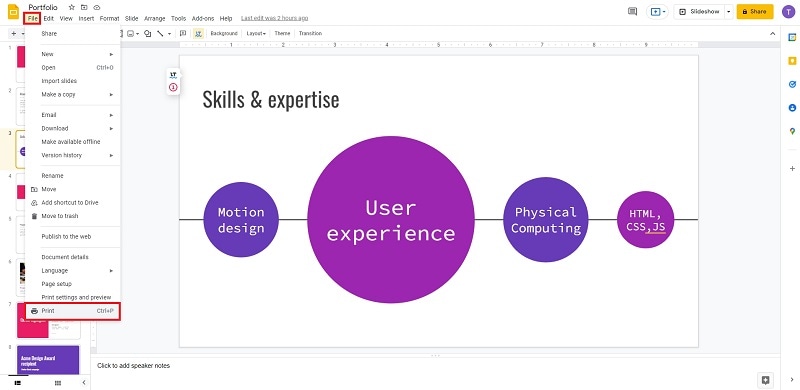
The second method to convert Google Slides to PDF format is printing as PDF. To use this method, first, you need to open the file you want to convert into PDF format and then go to the menu on the upper side of the screen.
After this, you need to click on the File tab and then click on the Print in the last option and now you are ready to print as PDF.
How to Edit Google Slide in PDF
PDFelement Pro works as simplifying the edit of Google Slides in PDF. By utilizing this software, you are able to modify watermarks, images, links, headers and footers, texts, pages, backgrounds as well as much more. PDFelement is compatible with Windows XP, Vista, 7, 8, and Windows 10.
Here is a step by step guide to editing Google Slides into PDF with the help of a PDFelement:
Step 1 Open Downloaded PDF in PDFelement
In order to edit Google Slides using PDFelement, you first need to open the PDFelement on your computer and then drag and drop the downloaded file you want to edit in the program or you can click on "Open files" on the Home screen.

Step 2 Edit PDF in PDFelement
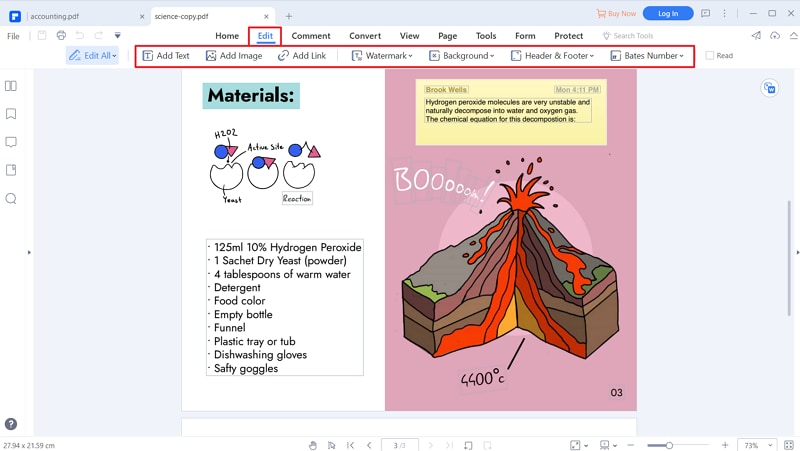
After you have selected a downloaded file to edit, it is now time to edit it. To edit it, you need to go to the "Edit" tab, and here you can see features such as "Add Text," "Add Image," and much more. Here you are able to modify your PDF file by adjusting the text, inserting a picture into the PDF pages or you can create a link in your PDF pages.
There are also features in this program in the "Comment" tab where you are able to make annotations to your PDF pages. To make annotations, you need to click on the "Comment" menu and choose the tool you want to utilize. For example, you can add a note to the file or emphasize critical text.

Step 3 Save PDF file
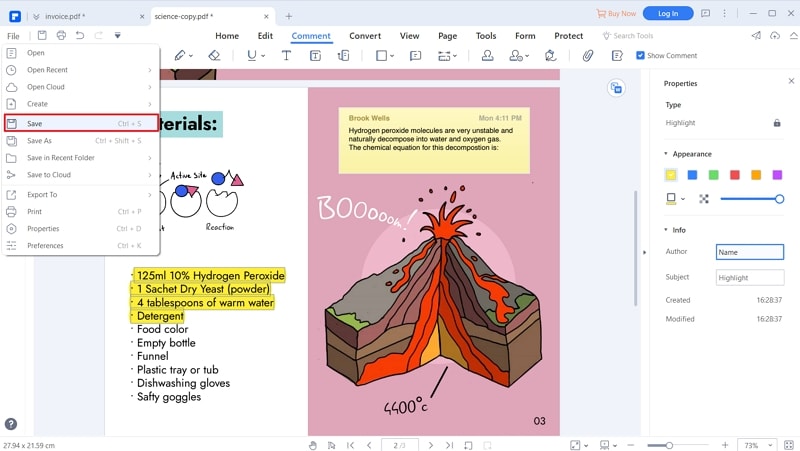
After you are done editing with your file, then you can select the File tab and come down on the options click on the Save button and that's it, your edited Google Slides into PDF are ready.


