In this article, we give you the best guide on how to combine JPEGs into one PDF on Mac with the best tool - PDFelement.
JPEG is one of the highly used image files because of its small size and compatibility with many software. However, you would want to combine your JPEGs to a single PDF in certain scenarios. When you combine your JPEGs into a single PDF, you can easily navigate and share them with ease. While this is true, many people still struggle to combine JPG to PDF on Mac. The secret to this is using the right PDF tool. Fortunately, this article gives you a detailed guide on how to combine JPEGs into one PDF on Mac using the best tool.
How to Combine Images into PDF on Mac
PDFelement is a powerful all-in-one PDF software that transforms the way you interact with your PDF files. This program is enriched with an assortment of excellent features to take user experience to another level. Because of its capabilities, speed, compatibility, and ease of use, you can handle all types and sizes of PDF tasks. With PDFelement, you can convert, create, edit, annotate, protect, compress, print, and perform OCR on PDF files. You can download the free trial version and then upgrade to the unmatchable premium version.
How to Combine Images into PDF on Mac
PDFelement offers a simple yet effective platform to combine JPG to PDF in Mac. First, you need to convert the target JPEGs to PDF, then combine them as illustrated in the following steps.
Step 1 Create PDF from Images
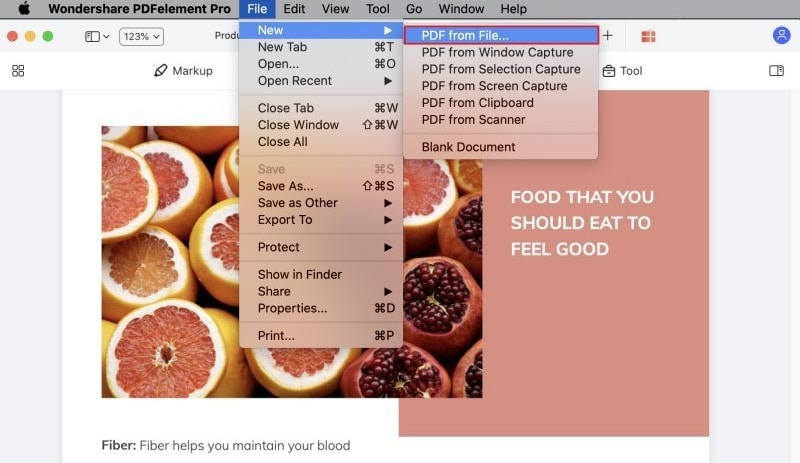
First, Open PDFelement on your Mac to access the main interface. Proceed to the "File" menu and hover the cursor over the "New" menu. Select the "PDF from File…" option. Choose the JPG files you want to combine to PDF from the file directory window. Once selected, click the right button to upload them.
Step 2 Save Converted PDF Files to Local Folder
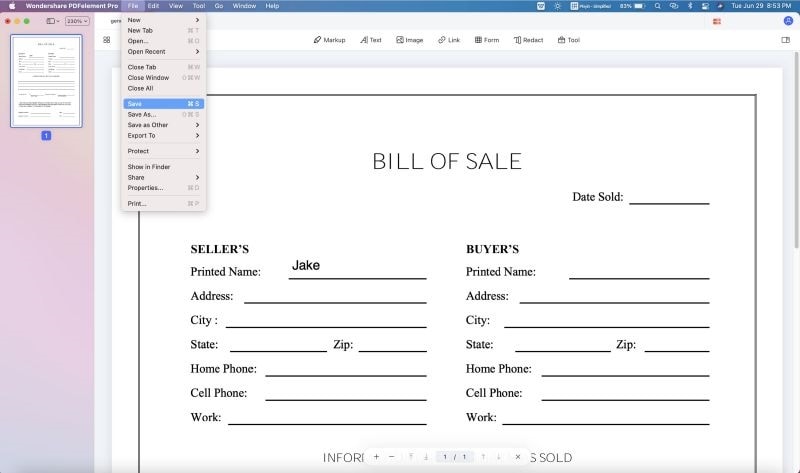
When the selected JPEGs are uploaded, PDFelement automatically converts them to PDF. Now, you need to save the converted files by navigating to "File" > "Save." Make sure you select a suitable local folder to save your converted image files.
Step 3 Choose to Combine PDF
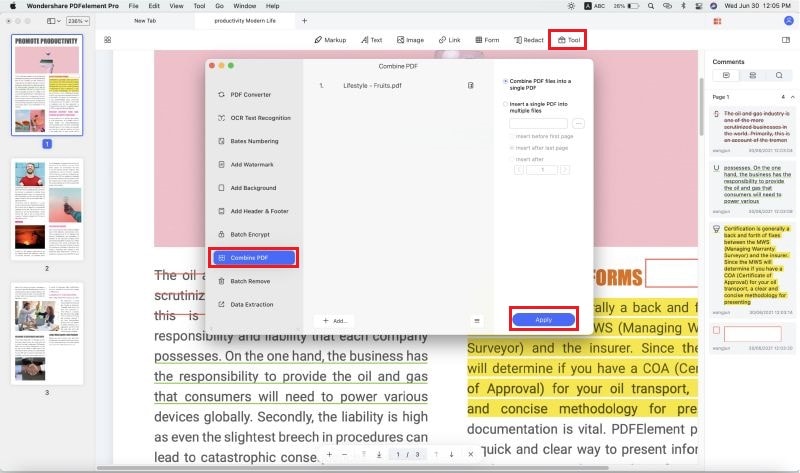
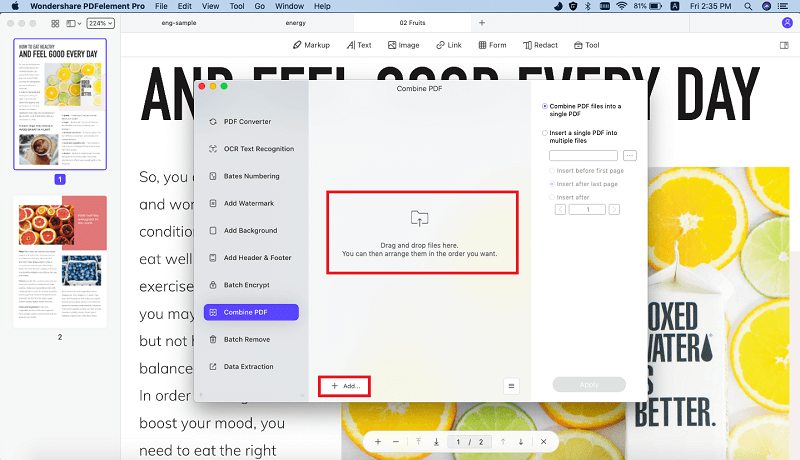
With the JPEGs now converted to PDF, you can proceed to combine JPEGs into one PDF. Simply hit the "Tools" icon at the top of the page and select "Combine PDFs" from the drop-down list. The program will immediately display the "Combine PDF" window.
Step 4 Add PDF Files
On the "Combine PDF" window, click the "Add" icon to access the file directory. Choose the images you just converted to PDF and upload them. You can also drag these files to the interface.
Step 5 Combine Images into PDF
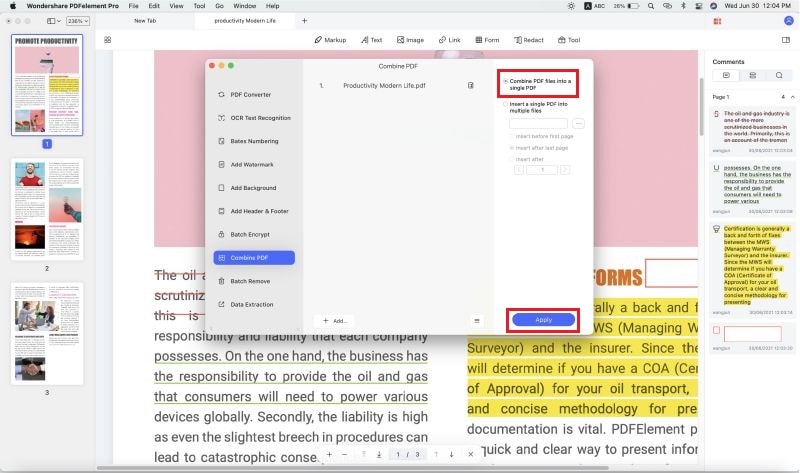
When the converted images are uploaded, select the "Combine PDF files into a single PDF" option at the top-right of the page. Finally, click "Apply" to allow the program to combine JPGs to PDF on Mac.
Another Method to Merge JPEGs into One PDF on Mac
Mac offers an inbuilt method to merge JPEGs into one PDF in Mac via the Preview app. Although this process is lengthy, it is still worth using, especially if you cannot afford a dedicated PDF tool. The following steps illustrate how to merge JPEGs into one PDF on Mac.
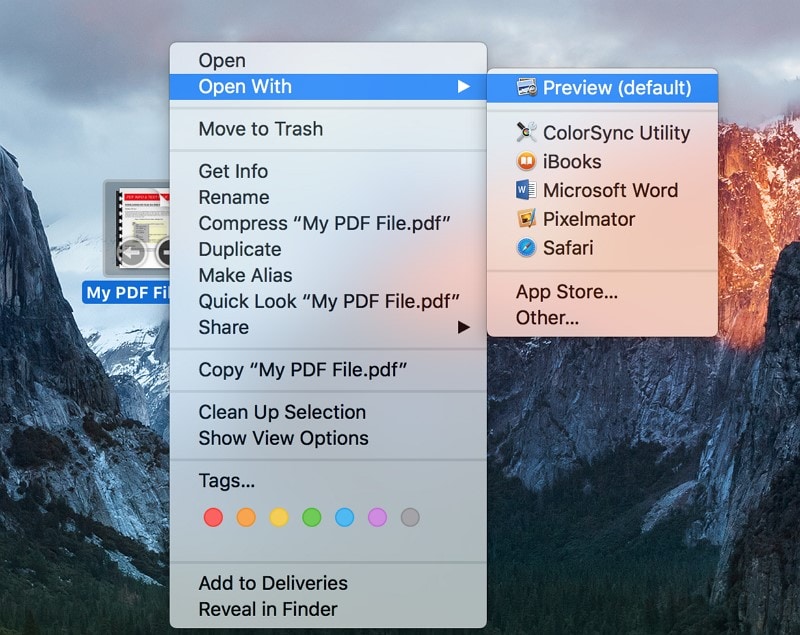
Step 1. Open the JPEG files on the Preview app on your Mac. To do this, select the target image files while holding the CMD key, then right-click and choose Open with>Preview.
Step 2. When the files are opened, go to the slider, then drag and drop the JPEG files to rearrange them in your desired order. When you are done, head to the "File" section, then choose "Print."
Step 3. From the "PDF" drop-down options, choose the "Save as PDF" option from the "PDF" drop-down options and choose the desired location and file name. When you are satisfied, hit "Save" to save the combined JPEGs.
