This article shows you how to fill PDF forms online using Adobe fill and offline using PDFelement.
Do you want to use Adobe to fill and sign PDF online? Without suitable applications, you can easily get frustrated trying to achieve your goal of filling and signing PDF files. This article will provide a step-by-step guide on how to sign PDF online using Adobe and other alternatives effortlessly.
How to Fill and Sign PDF With Adobe Online Free
Adobe Document Cloud is an application that allows you to save and share your PDF documents and fill and sign any form electronically. The following is a detailed guide on filling and adding Adobe signature for free to your PDF.
Step 1. Launch the Adobe Acrobat application and open the PDF document you want to fill by clicking “Select a file.”
Step 2. Next, you have to sign in to be able to sign your PDF.
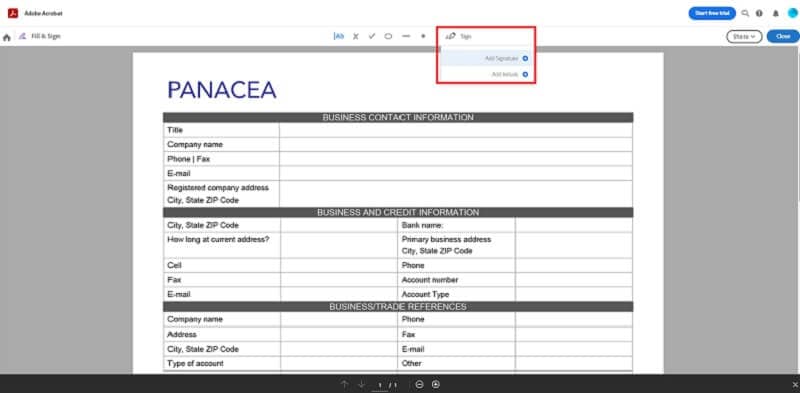
Step 3. Next, click on “Fill & Sign” on the right panel. Alternatively, you can click on the “Sign Yourself” to add your custom signature.
Step 4. Under “Add Signature,” you will have an option of adding Text, a drawing, or inserting an image signature. Once you are done, click on the “Apply” button.
Step 5. After that, you can modify and adjust your signature. Next, move to the top right, click on “Close” to save and download.

How to Fill and Sign PDF With Adobe Alternative Online
Wondershare Document Cloud is a cloud-based document management tool that makes the filling and signing of electronic documents safe and accessible for all its users. You do not have to sign up and register an account or download any software to use Wondershare document cloud. Here is a detailed guide on how to fill and sign PDFs with Wondershare Document Cloud.
Step 1. Navigate to the Wondershare Document Cloud on your browser and go to the home page. Click on the “Upload Files” button to open a File Explorer window and allow you to select the desired PDF. After clicking on the PDF, select “Open.”
Step 2. Next, click on “Document” on the left panel to view the uploaded file. Now right click on the document and choose “Send For Signature” or “Bulk Send” if you want to send files to many people for signing.
Step 3. After that, you can choose to add a password before adding the recipient’s email address. If you want to sign the document first, enable the “Sign First” button.
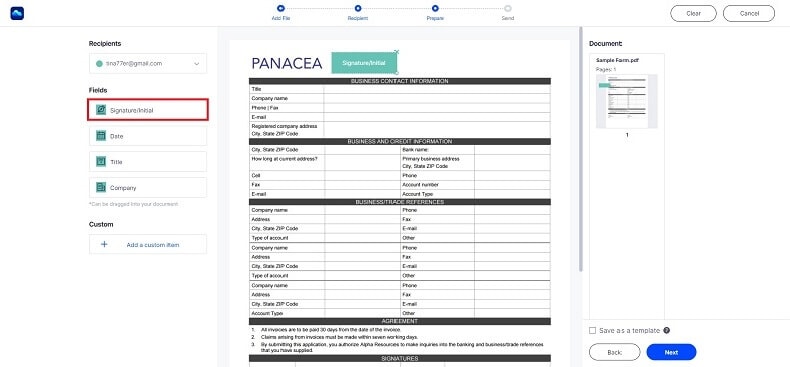
Step 4. Move to the next step and set the Signature/Initial field. Click on “Next.”
Step 5. Lastly, enter the message to the recipient, content and click on “Send.” The recipient will receive an email link to Wondershare Cloud, and they can add their signatures.

How to Fill and Sign PDF With Adobe Alternative on Desktop
PDFelement Pro is an excellent application that allows you to edit, convert, compress and print your PDF files. This application also allows you to perform OCR and annotate your PDF file. PDFelement is available for users with either Mac, Windows, or mobile devices and is highly convenient. The following is a step-by-step guide on how to fill and sign your PDF using PDFelement.
Step 1Open a PDF File
Launch the PDFelement application and access the primary home window. Click on the “Open Files” button to open a file explorer window and allow you to select the desired PDF. After clicking on the PDF, select “Open” to upload it to PDFelement, as shown in the image below.

Step 2Fill PDF forms
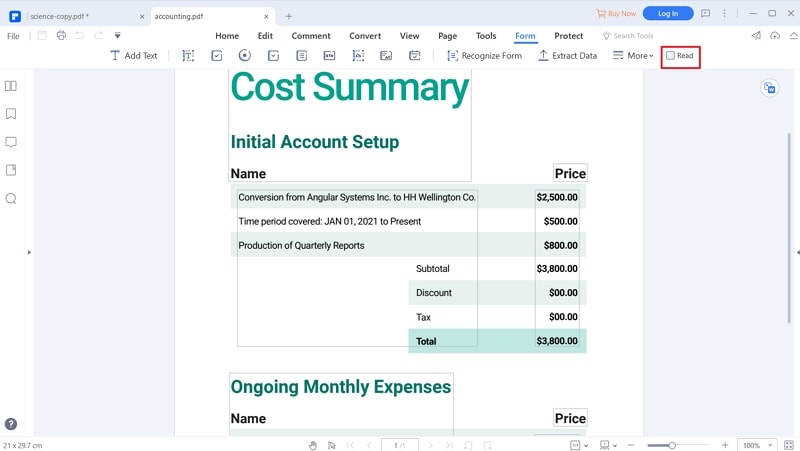
Once you have ascertained that your PDF has been uploaded, click on the “Form” tab and enable the preview button. Click on the text fields on the form that you want to fill in and enter the desired texts.

Step 3Create Digital Signature
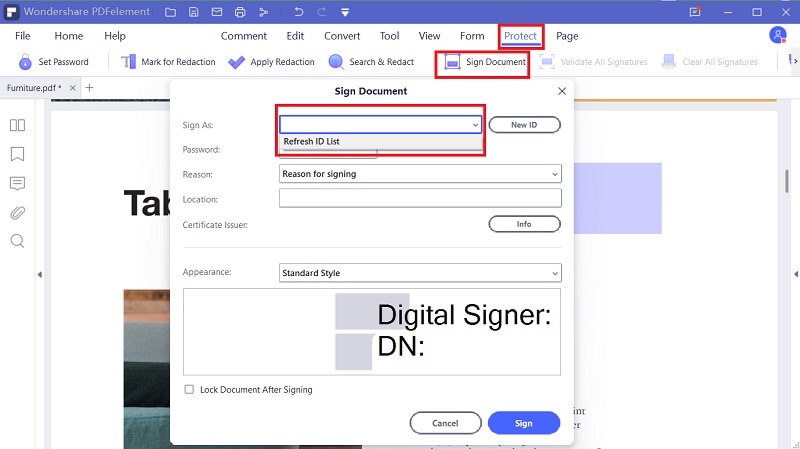
Next, click on “Protect” and then select “Sign Document” on the formatting bar. From the pop that appears, go to “Sign As” and choose to enter a new ID. On the pop-up window that appears, click on Select “I want to create a new digital ID” if you do not have an ID and follow the instructions to show you how you can generate a new one. Once you have successfully created a unique ID and password, click on “Sign” to apply the digital signature to the desired field, as shown below.

Step 4Save PDF
Once you have added a signature to your PDF, click on the “Save” button on the main menu to save the changes.


